How to hang a large Picture Frame without damaging walls?
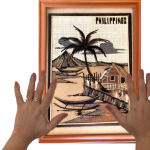
Beautify your walls by mixing large and small picture frames
You can create beautiful walls by mixing small and large picture frames and paintings. Develop artistic themes of abstract art, modern art or vintage in your bedrooms and living areas. You can also create inspirational art themes or comic art walls to brighten the younger side in you. We have discussed the methodology of hanging a small picture frame in another blog. In this blog we discuss how to hang large picture frames without any drilling or damaging the wall. Most of these picture frames are below 1 Kg in weight. You only need 2 KLAPiTs to hang these on your walls. If your frame weighs more than that, please use two additional KLAPiTs for every 1Kg.
Hanging large picture frames of less than 1 Kg
STEP 1 Decide where to place your picture frame?
Hold picture against the wall to select its best positionSelect a few options on the wall where the picture can be fixed.
Hold the picture against the wall. It is worth spending some time on this. You should consider the placement of furnishings in the room, lighting, color match, and visibility from different parts of the room.
If you have a friend or a family member around, ask them to watch it from a distance while you hold the picture. They can guide you about the symmetry of the picture against the structure of the wall and placement of other objects such as paintings, shelves, curtains, etc.
Hold the picture against the wall in the desired place and make small marks with a pencil in the middle of the top and the left edge of the picture. Then go back and visualize the picture there to estimate the symmetry against the wall and other objects.
You can erase the pencil marks after you hang your picture on the wall.
STEP 2 Mark where to install the steel tapes
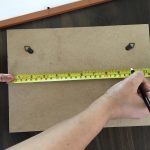
Using a measuring tape, mark the center of the top edgeMark the frame of the picture
Using a measuring tape, find the center on the top edge of the frame.
Mark a point 1.3 cm to the left of the center and call it “T”.
Similarly mark a point 1.3 cm to the left of the center of the bottom edge and call it “B”
Mark the Wall
Place the picture frame between the left edge and the top edge marks on the wall, placed in STEP 1 above.
Make marks similar to “T” and “B” marks created on the frame of the picture.
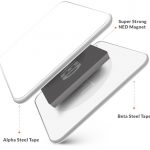
You will find inside 2 pairs of KLAPiT. Each Pair contains
1 Alpha Steel Tape (White Steel tape with an adhesive covered by a liner on one side)
1 Beta Steel Tape (Same as Alpha Steel Tape)
1 NED Magnet
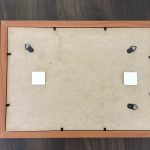
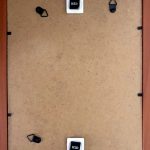
STEP 4 Install the two Beta Steel Tapes on the picture frame
Install two Beta Steel tape on top and bottom of the frame. If the frame is small then you can install the steel tapes on the MDF board alsoPlace the Picture frame on a hard surface with its back facing you.
Remove the liner from the first Beta Steel Tape and place it on the frame so that the left of the Beta Steel Tape touches the “T” mark on top edge of the frame.
Remove the liner from the second Beta Steel Tape and place it on the frame so that the left of the Beta Steel Tape touches the “B” mark on the bottom edge of the frame.
Press both the steel tapes firmly against the frame. The greater the pressure, the stronger will be the bond between the frame and the steel tapes.
Leave the picture for at least 30 minutes for the adhesive bond to strengthen.
STEP 5 Install Alpha Steel Tapes on the wall
Install the two Alpha Steel Tapes on the WallRemove the liner from the first Alpha Steel Tape and place it on the wall so that the left Alpha Steel Tape touches the “T” mark on the wall. Installing Steel Tape on the Wall
Remove the liner from the second Alpha Steel Tape and place it on the wall so that the left Alpha Steel Tape touches the “B” mark on the wall.
Press both the steel tapes firmly against the wall. The greater the pressure, the stronger will be the bond between the frame and the steel tapes.
Leave the steel tapes on the wall for at least 30 minutes for the adhesive bond to strengthen.
STEP 6 Install the Picture Frame on the wall
Attach NED Magnets to the Beta Steel Tapes.Attach the NED Magnet to the Beta Steel Tape.
Pick the large picture frame and attach the it to the wall so that the Ned magnet is between the two steel tapes.
You can adjust the picture frame by moving it clockwise or anticlockwise without pulling.
You will hear a strong KLAP sound when the NED Magnet attaches to the Alpha Steel Tape.
Hold the picture for a few seconds to feel that it is strongly held against the wall and is not sliding. (The picture frame may slide downwards if either weight of the picture frame is more than 1 Kg or if the steel tapes are incorrectly installed).
Removing the Picture Frame
The picture frame is held against the wall using a strong magnetic force and a very strong VHB adhesive. To remove the picture frame, slide it down, up or on either of the two sides. Remember not to pull the frame or else it may damage either the surface of the wall or that of the picture frame.
After you remove your product, you can use NED Magnet with another product in the same place. You can also attach the NED Magnet to the product and hang it on another wall which has an Alpha Steel Tape.
How to hang large picture frames of more than 1 Kg without drilling or damaging the walls?
If the picture frame is between 1 Kg and 2 Kg, it will mean that you need to use 4 KLAPiTs. Install one Beta Steel Tape on each corner of the frame and the respective Alpha Steel Tape at the corresponding places on the wall. Do these installations exactly as mentioned in Steps 4 and 5 above. Follow step 6 for installing the painting and step 7 for removing it from the wall.
In order to hang frames which are heavier than 2Kg, add four Beta steel tapes to the four corners of the frame. Then, add 2 beta steel tapes for every 1 Kg of weight on the edges of the frame. For example, if the picture frame weighs between 2Kg and 3Kg, you should install the two additional beta steel tapes – one at the center of the top edge and the other at the center of the bottom edge. And for frames weighing between 3Kg and 4Kg, the 7th and the 8th steel tapes will be installed at the center of each of the side edges and so on.
A word of Caution
Please install Steel tapes only on the flat and hard surfaces on the product and the wall. If there are any pins, paper or existing screws on the product, please remove them before installing the steel tapes. Also, please do not install the steel tapes on the existing holes. The steel tape needs strong surface to bond with. For further details please refer to our blog on common errors while installing KLAPiT. We also recommend you to watch a 2 minute video on ‘How to use KLAPiT?‘
The product makes me so happy! It is so easy to use, no unnecessary drilling required and geez, the NED magnet is strong!!!
Clap for #KLAPiT. No mess, No Fuss, No BlackHoles in White Walls
Modern solution Very useful every where homes schools supermarkets home furnishings exhibitions trade shows retail outlets etc
Fantastic product. Very innovative. Lovely klaping noise. 10/10. Too easy.
Wow what a product go drill free
Damage free to walls and reliable, unlike tapes or velcro Love this product!
Nice concept. Would suggest everyone to try it.
No more holes on the wall. No screws, no drilling the walls, no hammering nails, no hiring expensive external resources......Just KLAPiT.
Your solution to all wall fixtures.
The magnets blend into the wall like they're not there. Excellent.
It’s a really good product, didn’t need to drill holes in my walls to hang my painting and also had the option to switch even after hanging it ! Really good product, must buy.
Previous
Next
Design your home with our collection of DIY Projects